Backend
How it works
The front-end needs to show details of rides and attractions throughout the park to be useful to our park guests. Once you have built the back-end after this module our guests will be able to see much more useful information in the application.
The serverless backend
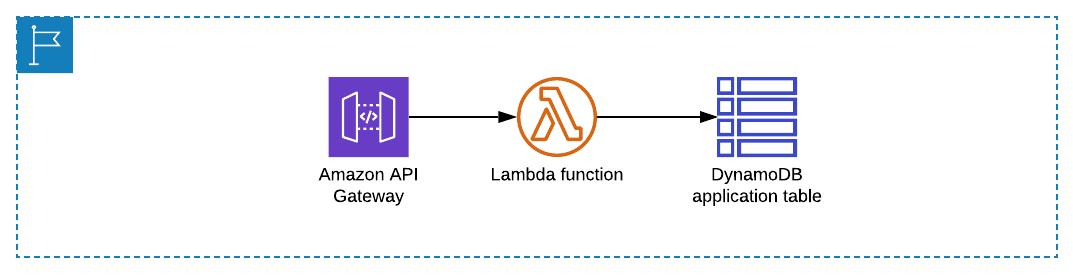
- A DynamoDB table which you will populate with information about all the rides and attractions throughout the park.
- A Lambda function which performs a table scan on the DynamoDB to return all the items.
- An API Gateway API creates a public http endpoint for the front-end application to query. This invokes the Lambda function to return a list of rides and attractions.
Once you have built the backend resources needed, you will update the front-end application configuration to query the API Gateway endpoint.
More information on this services used in this section:
Deploy the backend infrastructure
This is a good time to introduce SAM the Squirrel - SAM is the theme park’s mascot. SAM also stands for Serverless Application Model which is an open-source framework that makes it easier to deploy serverless infrastructure.
This allows you to specify your application requirements in code and SAM transforms and expands the SAM syntax into AWS CloudFormation to deploy your application. You will see and use SAM templates throughout this workshop.
More information on this services used in this section:
In this section, you will complete your first SAM deployment which will build much of the backend infrastructure which we will add to through the rest of the workshop.
Step-by-step instructions
-
Go back to your browser tab with Cloud9 running. If you need to re-launch Cloud9, from the AWS Management Console, select Services then select Cloud9 under Developer Tools. Make sure your region is correct.
-
Create a deployment bucket in S3 with a unique name. SAM will upload its code to the bucket to deploy your application services. You will also store this bucket name as an environment variable
s3_deploy_bucketwhich will make it easier to type future deployment commands. In the terminal, run the following commands which pulls youraccountIDfrom the Cloud9 Instance metadata and then creates and displays a unique S3 bucket name:
accountId=$(curl -s http://169.254.169.254/latest/dynamic/instance-identity/document | jq -r .accountId)

s3_deploy_bucket="theme-park-sam-deploys-${accountId}"

echo $s3_deploy_bucket

- In the terminal, run the following commands to create the bucket:
aws s3 mb s3://$s3_deploy_bucket
This has now created the S3 deployment bucket.
- Change directory:
cd ~/environment/theme-park-backend/codes/1-app-deploy/ride-controller/
- Use SAM CLI to deploy the first part of the infrastructure by running the following commands:
sam package --output-template-file packaged.yaml --s3-bucket $s3_deploy_bucket

sam deploy --template-file packaged.yaml --stack-name theme-park-ride-times --capabilities CAPABILITY_IAM
This will take a few minutes to deploy. You can see the deployment progress in the console. Wait until you see the Successfully created/updated stack - theme-park-ride-times confirmation message in the console before continuing.
- Now, change directory:
cd ~/environment/theme-park-backend/1-app-deploy/sam-app/
- Use SAM CLI to deploy the second part of the infrastructure by running the following commands:
sam build

sam package --output-template-file packaged.yaml --s3-bucket $s3_deploy_bucket

sam deploy --template-file packaged.yaml --stack-name theme-park-backend --capabilities CAPABILITY_IAM
This will take a few minutes to deploy. You can see the deployment progress in the console. Wait until you see the Successfully created/updated stack - theme-park-backend confirmation message in the console before continuing.
SAM has now used CloudFormation to deploy a stack of backend resources which will be used for the rest of the workshop:
- 2 Lambda functions
- 3 S3 buckets
- A DynamoDB table
- A Cognito UserPool
- An AWS IoT thing
- Several IAM roles and policies.
- Configure environment variables.
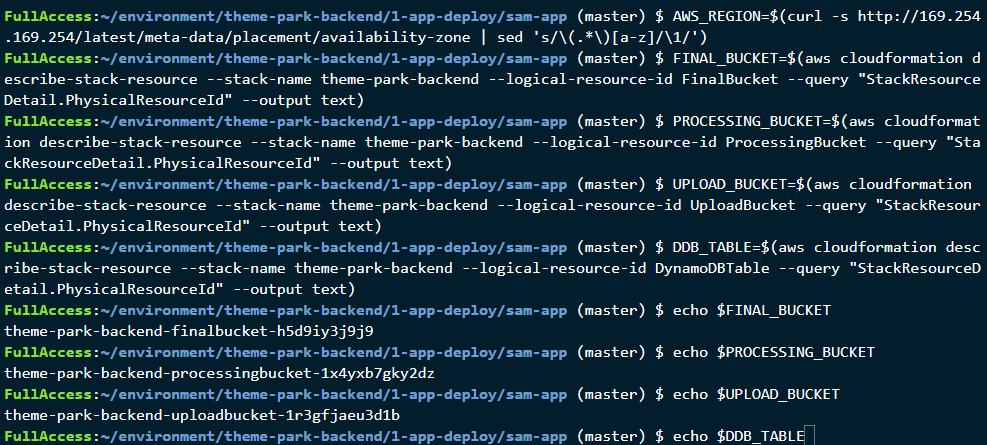
Set a number of environment variables to represent the custom names of resources deployed in your account. These commands use the AWS CLI to retrieve the CloudFormation resource names and then construct the environment variables using Linux string manipulation commands grep and cut. This makes it easier to type deployment commands in later modules. In the terminal, run:
AWS_REGION=$(curl -s http://169.254.169.254/latest/meta-data/placement/availability-zone | sed 's/\(.*\)[a-z]/\1/')
FINAL_BUCKET=$(aws cloudformation describe-stack-resource --stack-name theme-park-backend --logical-resource-id FinalBucket --query "StackResourceDetail.PhysicalResourceId" --output text)
PROCESSING_BUCKET=$(aws cloudformation describe-stack-resource --stack-name theme-park-backend --logical-resource-id ProcessingBucket --query "StackResourceDetail.PhysicalResourceId" --output text)
UPLOAD_BUCKET=$(aws cloudformation describe-stack-resource --stack-name theme-park-backend --logical-resource-id UploadBucket --query "StackResourceDetail.PhysicalResourceId" --output text)
DDB_TABLE=$(aws cloudformation describe-stack-resource --stack-name theme-park-backend --logical-resource-id DynamoDBTable --query "StackResourceDetail.PhysicalResourceId" --output text)
echo $FINAL_BUCKET
echo $PROCESSING_BUCKET
echo $UPLOAD_BUCKET
echo $DDB_TABLE
The terminal now looks like this, echoing back all the set environment variables:
SAM has now used CloudFormation to deploy a stack of backend resources which will be used for the rest of the workshop, 2 x Lambda functions, 3 x S3 buckets, a DynamoDBTable, Cognito UserPool, AWS IoT thing and a number of IAM Roles and Policies.
Populate the DynamoDB Table
DynamoDB is a key-value and document database which we will use to store information about all the rides and attractions throughout the park.
The SAM template created a DynamoDB table for the application. Next, you will fill the DynamoDB table with data about the rides and attractions in the park. You will run a local Node script in this repo to upload the data to DynamoDB.
Step-by-step instructions
- From the Cloud9 console, navigate to the local-app directory in 1-app-deploy:
cd ~/environment/theme-park-backend/codes/1-app-deploy/local-app/
- Install the NPM packages needed:
npm install
Ignore any NPM warnings or errors - do not run npm audit
- Run the import script:
node ./importData.js $AWS_REGION $DDB_TABLE

Test the configuration
Step-by-step instructions
- Confirm that the data is now in the DynamoDB table by running the following command:
aws dynamodb scan --table-name $DDB_TABLE
This will return all the data in the table together with a “ScannedCount”, which is total number of items in the table.
- Call the API Gateway endpoint URL which SAM has created. First, run the following command in the console to show the endpoint URL:
aws cloudformation describe-stacks --stack-name theme-park-backend --query "Stacks[0].Outputs[?OutputKey=='InitStateApi'].OutputValue" --output text
Note the command’s output for the InitStateApi - this is your API Gateway endpoint. You will need this in later sections.
- Once you have the endpoint URL, select the URL link in the Cloud9 terminal and select Open:

This opens another browser tab and returns all the raw ride and attraction data from the DynamoDB table via API Gateway and Lambda. You have now created a public API that your frontend application can use to populate the map with points of interest.